Monday, October 26, 2015

Finished my Warlock, and I think he looks amazing. (Bones 77040)

Okay, it's a bit pathetic to say your own work looks amazing, but I am really surprised how well he turned out. As I was watching him progress I kept saying to myself "Did I really do that?"

So what the hell, time to pat myself on the back.

Take a look at this bad guy.


And this is with some quick and dirty photos under bad light.

Reaper Bones mini 77040, aka Satheras the Warlock.


Believe it or not, the shirt and the belt are the same base colour, with the difference being the wash and the highlight. With just the washes the colour difference was astounding. I used this guy to learn a lot about different blending and colour techniques.

Quite a bit of the brown highlight has a touch of green added to give it a more natural look, and I think it worked well. I kept the face simple, because without the direct lighting the eyes are pretty much in shadow from the hood.

The gem was done with many layers of green glaze directly onto the bones white, and a finishing touch of a darker highlight to give the edges some definition.


The scroll was a couple of different highlights on a dark colour to get a parchment colour, then some scribbles with a deep green to give it an evil colour. I considered red, but I wanted the only red to be the single dot on the staff under the gem.


I would be proud to put this guy on any table, and for one of my early non-guide driven paint jobs I think it shows that I am now a good mini painter and can do anything I want.

Overall effort, about 6-7 hours.

Monday, October 19, 2015

Warlock in Progress - Bones

It's been ages since I have posted, and I just wanted to share this.

I got handed a whole box of Bones minis, which has overwhelmed me a little, but is so amazing. I started painting a Warlock and realized I wanted to paint all the clothes before I based the staff, skin and scroll because I knew that while painting the clothes I would get paint on those and I didn't want to have to fix what I had done.

This is an in progress shot because I am really happy with how the highlighting has gone. It's a quick photo taken under poor conditions, but this has been only about 3 hours so far, and I have tried several different colour blends doing it. Having a lot of fun.


You really can't see it, but I tried a nice green blend for the strap on the boot and the knee pad. It looks amazing when I look at it through the magnifier, but at 1x magnification it just looks like a mild highlight. However it's kind of cool that the detail is there.

This guy still has a fair way to go.

I just realized I have completed three new Imperial Assault minis I haven't posted here yet. Two wookies and IG-88. I will try to post those soon.

Tuesday, September 15, 2015

Jyn Odan - The Rebels Prepare

This is another case of the miniature looking much better under normal light than under lighting for my crappy camera setup.

Jyn Odan came together really well, and a lot faster than I thought she would. Again, the combination of the wet palette and the magnifier really speeding up my painting.

Also, I am getting better. I think the photos at page render size are much more representative of the mini in reality, the larger photos are what they look like under about 5x magnification, and that isn't the quality my painting is aiming for.

I am still working on improving my highlighting skills, but I like where I am getting, I think the jacket came out great. The final thing I did was add a watered down gloss varnish to the jacket to give the leather a sheen, but while it looks great, I think I could have watered it down a little more and make it a little less shiny. Oh well.


This is my first attempt at doing eyes. A simple technique, but I think they came out very well.


The details of the jacket at the bottom I could never have done without the magnifier, not this well.


I am catching up with the Sorastro Imperial Assault guides, and getting faster. I am enjoying the quality of what I am getting following his guides, so I am not planning on jumping ahead, but if I catch up I will work on other stuff.

You can see Jyn unpainted from my post back on the 1st of August.

Next up, Wookies.

Sunday, September 6, 2015

Cave Troll - Reaper Bones 77004 - My first detailed effort with a magnifier.

So I bought a $10 magnifier on eBay. It does 2x and 4x magnification and I wanted to see what I could do with it.
I also wanted to start painting some Reaper Bones mini's I had in detail. There is one I started about 6 weeks ago that didn't go well, but this is a new one I started only Friday night, and with both my new practice and the magnifier, I think it came out really well.

So, without further delay... The Cave Troll!


To say I am happy with him would be an understatement. I think he is my best work yet, and I didn't follow any guide. This was pure me.

There is some highlighting that isn't done the way it's generally accepted it should be done. But whatever, I think he looks great.

Sunday, August 30, 2015

My first commission - Casiatta - a Reaper Bones Miniature

So one of my best friends who plays a lot of D&D had just bought a heap of mini's for characters for up coming campaigns. He plays in a 2 player campaign for about 12-18 months with a hero character, from Level 1 to Level 30, and then they reset and play another. Generally there are two campaigns running, where each of them is the DM and the other is the hero. He loves these campaigns.

So he just discovered Reaper Bones, and had bought a few minis that he thought might be the next hero he would play. He asked me if I would paint one or two of them.

His requests for this one was:

  • Red hair.
  • A paladin or calavier type character.
  • Don't spend too long on it.


So I thought I would try my hand at doing a really fast paint. Turned out that was about 90 minutes. It was actually about 5 hours, but I only spent 90 minutes of that at the painting table or doing anything relating to the mini.

I didn't spend long trying to decide on colours, and I pretty much did base, wash, and then some selective highlights.

I also took this as an opportunity to play with colours. Such has what happens if you use a blue wash on iron, or green on leather and brass to give a slightly different look. At the end the sword looked really dull, so I gave it a very light yellow glaze and then re-highlighted the edge - to try to make it look like it was glowing with holy light.

All in all, I am pretty happy, considering I spent so little time on it.

Enjoy.


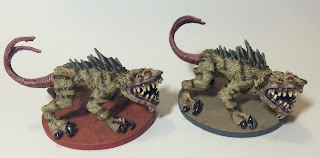
The Nexu are ready to consume whoever gets in their way.

It has been four weeks since I posted the image of the unpainted Nexu, and in that time I have spent pretty much every painting hour working on them. Unfortunately, I didn't get as many painting hours as I wanted, but I really think they have been worth it.

The Nexu are about 12 feet long and when they come towards you, salivating, I challenge any foe, Rebel or Imperial, to stay calm. The minis are around 6cm long.

This is by far the most detailed work I have done with a paint brush, and while my photographing is getting better, it still doesn't come close to doing these figures justice. On the table they look amazing.


Showing the different striped patterns on each Nexu.


You never want to get this close to these teeth.


The cracked ground effect was something I decided to do myself, it was not part of the original guide, but after seeing the Nexu again in Attach of the Clones, I thought the effect would work. Being able to use the different ground colours for the elite and regular deployment group I think really works well.

When you compare these to the unpainted figures I posted earlier, and you see just how amazing the Sorastro guides for the Imperial Assault miniatures are. Once again, I followed them to the best of my skill, and in doing so painted to a quality well beyond what I am capable of coming up with on my own.

Saturday, August 1, 2015

Jyn Odan and Nexu pre-painting

A few people have asked what the Imperial Assault mini's look like before painting. So here are the next three I am working on before I start painting.

All I have done is some mold line removal and I have washed them. It's disturbing how visible the mold lines still are in these photos, but I can't feel them and I have filed them as much as I dare for now. I have mentioned before that mold line removal is something I need to get better at, and I am - slowly.

Also, they look a lot worse in the photos than in real life, due to the massive magnification.


Trandoshan Hunters

After many more hours than I expected, the Trandoshan Hunters are ready for deployment.


The leader of them is Bossk.


Then there is the one who's outfit I based on Han's Hoth outfit. I am really happy with how he came out. Though his base needs some touch up.


Finally there are the secondary guys in the Elite and Standard deployment groups. These guys are in a camouflage pattern. Of course this is based on Sorastro's guides, as all of these paint jobs are.


So here are the two deployment groups ready to hit the table and cause some trouble for the Rebel Scum!


Monday, July 6, 2015

The Dark Lord of the Sith

After only a couple of days work, Darth Vader is done - and the photos don't come close to doing him justice. I really need to get better at taking photos of miniatures.


I think this photo shows the glow of the lightsaber quite well.


This one shows the highlights on the back of the cloak, which I am really happy with. Getting highlights on black are supposed to be hard, but following the guide and being able to get a lot of subtle different mixes really make this come to life.


He took less than half the time I expected, and I really do put it all down to the wet palette. This is what it looked like when I was done with Vader. It looks like there is a lot of paint wasted, but I was getting less than half of what I used to out of the pot, and still getting too much. Some of these sections have also had as many as ten different mixes of colour in them, adding different effects.


If you want to see how I did this, have a look at Episode 7 of Sorastro's Imperial Assault Painting Guide.

Wednesday, July 1, 2015

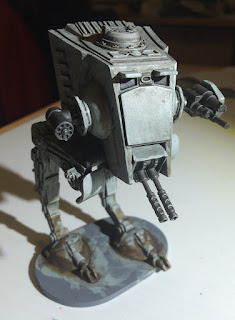
AT-ST Ready for Deployment

Finally, my AT-ST is ready for deployment.

The rebel scum will run in fear when this machine of Imperial might comes their way.


This took many hours, and a lot of new skills, and after all of that it looks fairly plain and worn - but that's pretty much the desired effect. This AT-ST looks like it has seen a lot of duty.

As always, there are some aspects of it that look no where near as good as I had hoped, but I think that will always be the case - because if I am not challenging myself, then this won't be as much fun.

But this thing is going to look great on the table.

Monday, June 29, 2015

No painting update, but a solution to storing my paints

Due to migraines I haven't finished my AT-ST, but yesterday I did find a solution to my paint storage. I had been looking for something to show the paints, while keeping them easy to access and that looked good. I originally thought I would go for a large spice rack or something like that.

Instead I found these shelves.


Three of these would hold the entire Citadel paint range (just) and the grey bases are very grippy and mean the pots are very secure. Before yesterday I just had a growing sprawl of pots over my painting area, now I feel like I not only have organisation, but room to grow. And the OCD part of me thinks the paints in a row look pretty.

Of course now I just need to avoid buying paints I don't need just to fill colour gaps.

Saturday, June 27, 2015

AT-ST Post Corrision - Almost done

Here is the AT-ST post highlight and corrosion.

Almost done. Just some mild rust drybrushing and the base to finish.


One thing that happened is the guns, which were really loose, are now completely stuck and don't move at all. No idea when that happened. Fortunately they are in a good position, so I am not sure I want to do anything about that.

Wednesday, June 24, 2015

AT-ST Post Black Wash

So I finally did the black wash on my AT-ST last night, and it came out okay. Not as smooth or as clean as I would have liked. The cloth I used was too large and too awkward to handle, and I lost too much time trying to hold it right so I could get it where I wanted and that resulted in the Nuln Oil drying too much sometimes. I also had some overruns of paint I didn't see until too late.

Nothing I think that will ruin the mini however.


I am now a little over half way done with the AT-ST, probably about 4-5 hours of work left. I have another one to do that will be more complex, but I think the lessons I have learned will help me with that one.


Saturday, June 20, 2015

AT-ST about 1-3 of the way through...

This is my AT-ST from Imperial Assault about 6 hours into the painting journey, and before the wash.

I am really nervous about screwing up the next stage, so I wanted to share what it looks like now in case it goes horribly wrong.


Monday, June 15, 2015

DungeonQuest Minis - Aiming for Quick and Table Ready

With my Imperial Assault minis, I have been following Sorastro's guides and often putting in a LOT of hours to get the best possible quality I can with my skill level.

However, I am also wanting to use what I have learned to make other minis "table ready".


So first I had to define what I felt was "table ready" for myself.

  • It has to look like the character from the game.
  • It has to stand out on the board.
  • It has to be clear which character it is.
  • It has to look good at play distance, which is normally at least 30cm away.
  • It does NOT need to look amazing at close up distances.
Then I had to set myself a goal with regards to how long I think it should take me to do a "table ready" mini. I have started with a time frame of 2 hours, but I hope to get it down closer to 60-75 minutes. This includes all setup and cleanup time, in an hour of painting time, I probably only spend about 20 minutes with brush in hand.

So here is my first attempt at this. Hugo the Glorious from DungeonQuest: Revised Edition.


Here is the original art from the game I was trying to replicate.


The DungeonQuest minis are a lot smaller than the Imperial Assault ones, only about 30mm high. Those squares behind him are 1 inch.

All in all, I am very happy with this.

I need to get a better system for taking photo's of miniatures. The camera I have doesn't seem to be able to cope very well.